The magic ring, also commonly called a magic circular, is a great stitch for any beginner to learn. This stitch can be used for making any pattern that goes in a round. When a pattern goes in a round there is no point where you have to stop and turn your project, but the project is worked continually around. This can be used for so many patterns! Including hats, gloves, granny square patterns, appliques, stuffed animals/dolls and so much more!
The magic ring will allow you to get a really tight closure in the middle of your pattern. Other methods for closing patterns that go in a round often can give you a gapping center, but with the magic ring, you will be able to pull the magic ring tight to close so that you don’t have this issue.
Any size hook and any size yarn can be used when doing the magic ring. But once again it is important to look at the weight of your yarn and make sure it is compatible with the hook size that you are using for the best results.
This stitch can sometimes seem like a daunting stitch and may take a few tries before you get the hang of it but once you figure it out it is fairly simple! It is a stitch that you can refer back to for any pattern you want a tightly closed center for!
What I will be using for this stitch
- Size H hook (5mm)
- Medium weight yarn
Stitches you will need to know for this pattern
Ch – chain
Sc – single crochet
Sl -st – slip stitch
Pattern
There is a visual representation of each part of the pattern below every few steps.
Watch our tutorial to learn along with this article.
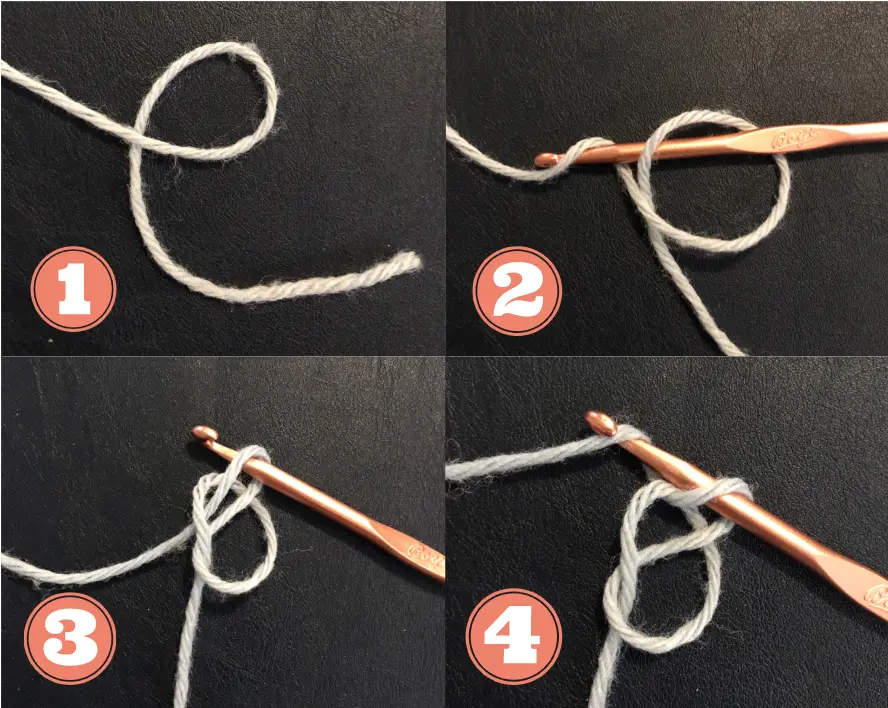
Step 1
Pull out enough yarn so that you can have a generous size loop to work with. The yarn closest to your ball of yarn is the working and the yarn furthest from it is the tail. Taking the tail side of the yarn make a letter “e” so that the working yarn is going over the top of the tail portion of the yarn. This can either be done on a flat surface or in the palm of your hand. (See Picture)
Step 2
Insert your hook into the loop of the upper portion of your “e”. It should go over the outside portion of your “e” and under the inside of the “e” where the yarn has crossed over each other. Once through the loop take the working yarn and wrap it around your hook from the back to the front. Wrapping it around your hook just as you would to “yarn over” in any other crochet stitch. (See Picture)
Step 3
Keeping the yarn wrapped around your hook, pull your hook back up through the “e” loop. It might help to hold or pinch the crossed point with your fingers while doing this because the loop is so loose at this point. (See Picture)
Step 4
Taking your working yarn make another loop on your hook from back to front (yarn over). Make sure that you do not let the crossed point of your original loop fall apart. (See Picture)

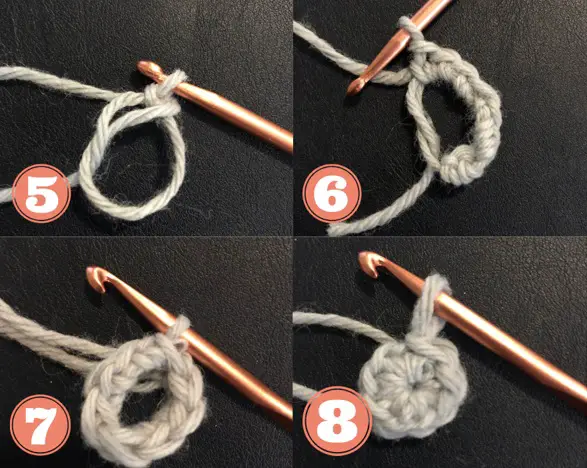
Step 5
Pull the working yarn hook through and up. This has created the first chain crochet stitch onto the magic ring. (See Picture)
Step 6
Now you will begin stitching as many single crochet stitches as you need for your pattern. By inserting the hook into the ring, yarning over, and pulling the yarn up and through. For the sake of practicing this pattern let’s do 8 sc into the circle. (See Picture)
As you are doing your sc around the circle make sure that you are keeping the circle loose. You do not need to try and pull to tighten it as you go.
Step 7
Once you have done your 8 sc (or however many you need for your pattern) join your last stitch to your first ch on the magic ring with a sl st. (See Picture)
Step 8
Once you have joined the stitches together complete the round pull on the tail end of the yarn to pull the ring together. This is where you can pull it as tight as you would like to give the pattern a secure closure. (See Picture)
If there is still a big hole that is in the middle of your circle or if you can’t pull the ring closed this could be due to too many stitches in the magic ring’s center. If you put too many single crochets into the center the yarn might not be able to easily slide too close. Another reason you could be having trouble is if your yarn is tough. The texture of the yarn could prevent it from easily closing when you pull the yarn tight.
IMPORTANT
It is important to weave the tail of the yarn into your project whenever you are done with your pattern. If you do not do this then the ring could become loose and your crochet project could unravel from the center.


