Crochet patterns can be written out or make use of symbols or grafts. Crochet patterns may seem a bit confusing and intimidating unless you know the basics of how to read and understand them. Most designers use a standardized set of symbols, abbreviations, and terms when writing their patterns. In this post, we’ll learn these elements and how they are used in a crochet pattern.
Written Patterns
The most common type of pattern is a written pattern. Abbreviations are used throughout the pattern since it would be too lengthy and confusing to completely write out the stitches and instructions. The following table lists the most commonly used abbreviations used in today’s patterns. You can find the Crochet Abbreviations Master List on the Craft Yarn Council’s website.
| Stitch Name | Abbreviation |
| Chain stitch | Ch |
| Stitch/Stitches | St/sts |
| Slip stitch | Sl st |
| Single crochet | Sc |
| Double crochet | Dc |
| Half double crochet | Hdc |
| Treble crochet | Trb |
| Repeat | Rep |
| Single crochet 2 together | Sc2tog |
| Double crochet 2 together | Dc2tog |
| Half double crochet 2 together | Hdc2tog |
US vs UK Terms
A word of caution, UK and US terms are different. When you find a pattern, check and see if it is written in US or UK terms. Usually, the designer will tell you if the pattern is not in US terms.
I remember once I found a pattern I wanted to try out and started to work on it. Well, my project looked nothing like the picture. It was much larger and I couldn’t figure out what I was doing wrong. After ripping it out a few times I took a closer look at the pattern. Sure enough, it was written in UK terms. This meant where I read double crochet, the designer actually meant single crochet. Once I realized that fact I could work the proper stitches and the project came out correctly.
If you find a pattern written in UK terms, you can use this table to translate it.
| US Terms | UK Terms | ||
| Chain | Ch | Chain | Ch |
| Slip stitch | Sl st | Slip stitch | Ss |
| Single crochet | Sc | Double crochet | Dc |
| Half double crochet | Hdc | Half treble | Htr |
| Double crochet | Dc | Treble | Tr |
| Treble crochet | Trb | Double treble | Dtr |
This pattern is one I designed a few years ago. Here is what the complete pattern looks like.
Now, let’s take a look at a few key sections of the pattern.
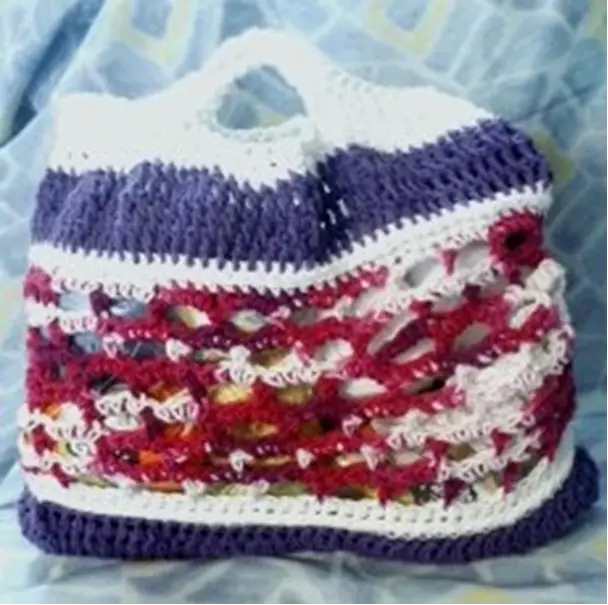
Staggered Mesh Bag
You will need Lily Sugar ‘n Cream cotton yarn in Purple (A), Love (B), White (C), a size J/10 ½ (6.50mm) crochet hook, and a tapestry needle.
Bag measures about 14 inches tall and around 18 inches across one side.
Notes: The base is crocheted on both sides of the foundation chain to form an oval. The 2 single crochet stitches into the last 2 stitches of the row and into the first stitch of the next row create the curve needed to crochet the sides in the round. Do not turn the chain when you reach the end but crochet the second set of two stitches into the bottom of the last chain stitch.
The first few sections of the pattern tell you the materials you’ll need. For this pattern, you will need three colors of cotton yarn. You don’t have to use the exact brand I did, but you will need to use a comparable weight and fiber for the bag to turn out correctly. I used a size J/10 hook, but if you use a larger or smaller hook keep in mind this will affect the size of the finished bag which measures 14 inches tall and 18 inches wide.
I have included important instructions in the Notes section. These instructions help you work the pattern and give you tips on how to get the bag started from the base up.
Base
With Color A ch41
Row 1: Sc in 2nd ch, 39sc to end of to last ch st, 2sc into last st, turn ch and crochet 2sc into the opposite side of last st
Row 2: sc into ch to last st, 2sc into last st, turn ch, 2 sc into the opposite side of sts, sc across row, 2sc into last st
Row 3: 2sc into 1st st, sc across row, 2sc into last st, 2sc into next st, sc into next st, sl st to join.
The bag is begun by crocheting the base. As you can see I use abbreviations for the stitches. Here is what this section of the pattern would look like if I wrote out each stitch and instruction.
With Color A chain 41
Row 1: Single crochet into the 2nd chain, work 39 single crochet to the end of the last chain stitch, work 2 single crochet into the last stitch, turn chain and crochet 2 single crochet into the opposite side of the last stitch.
Row 2: Single crochet into the chain to the last stitch, 2 single crochet into the last stitch, turn chain, 2 single crochet into the opposite side of the stitches, single crochet across row, 2 single crochet into the last stitch.
Row 3: 2 single crochet into the 1st stitch, single crochet across the row, 2 single crochet into the last stitch, 2 single crochet into the next stitch, single crochet into the next stitch, slip stitch to join.
Notice how writing out everything is cumbersome and makes even a basic pattern pages long. This is why designers use a standardized set of abbreviations and terms.
Pattern Repeats
Repeats in patterns are denoted by asterisk, brackets, and parentheses. For example, *3dc into the next st, ch1, sk next st* rep 3 times means to work 3 double crochet into the next st and then chain 1, skip next stitch. You would begin at the first *, work the stitches to the next * and then go back and do the same process for a total of three times across the row.
Brackets and parentheses are used within pattern repeats to denote a group of stitches. For example, when crocheting a Granny square you repeat a set of stitches around the square. The pattern may look like this: ch4, *3dc into next ch1 sp (3dc, ch3, 3dc into next ch3 sp), ch1* rep around the square, 3dc, ch3, 2dc into last ch3 sp, join in the 3rd ch of the starting ch
While the pattern repeats around the square, the corners are a set group of stitches. This is why they are in the parentheses, so you know to work them all in the same space. Brackets and parentheses are used interchangeably depending on the designer.
Tips for Working with Written Patterns
First, don’t be afraid of written patterns. Begin with easy patterns and work your way up to more advanced patterns. The more you use patterns, the easier they will become to understand.
Read the pattern before you begin. I know, I know, you want to grab your hook and yarn and jump right in, but take it from someone with years of experience, read over the pattern first. Make sure you understand all of the instructions and stitches before you begin. If the designer failed to explain key stitches you can find lots of tutorials online and videos on YouTube to help you learn and refresh your skills.
Gather all the materials you will need before you begin. Check and make sure you have enough yarn. You can substitute yarn brands if you use the same weight and fiber content. For example, if the pattern calls for Red Heart Super Saver but all you have on hand is Caron Soft, you can use it since they are both medium-weight acrylic yarns. Sometimes you can use a different fiber if the yarn is the same weight. Keep in mind if you use a different weight of yarn it will affect the size of your finished project.
Take the time to work up a gauge swatch. Gauge refers to how many stitches and rows are in a 4 by 4 inch of fabric. Compare your swatch to the gauge of the pattern. They should match closely. If not, you may have to loosen or tighten your tension or use a larger or smaller hook.
And the most important tip I can give you is to relax and enjoy it. Keep in mind even the most advanced crocheter makes mistakes and must rip out stitches.
Working with Crochet Symbols
Crochet symbols may seem like a foreign strange language. Well in a way they are since anyone can use them no matter what language they speak. Patterns written with symbols for crochet in the round projects are called diagrams. Flat projects use charts. Someone in the US can work a chart from Russia since the instructions use a standardized set of crochet symbols and not words. If you can read and understand crochet diagrams and charts, you open an entire world of new patterns.
Each stitch has a specific symbol and these symbols combine to form the pattern. One of the good things about diagrams and charts is they are visual representations of the pattern. This makes it easier to see how the stitches join and what your project looks like when it is completed.
Very large diagrams may only show a section of the pattern. This section is then repeated a specific number of times to finish the project. This is usually done with large crochet in the round projects such as doilies.
Diagrams for crochet in the round projects begin in the center of the chart and are worked out from the center. Charts for flat projects are worked in rows beginning at the bottom right corner. (The foundation chain is not usually counted as a row.) Odd rows are worked from right to left, and even rows from left to right. Flat charts are worked from the bottom of the chart up.
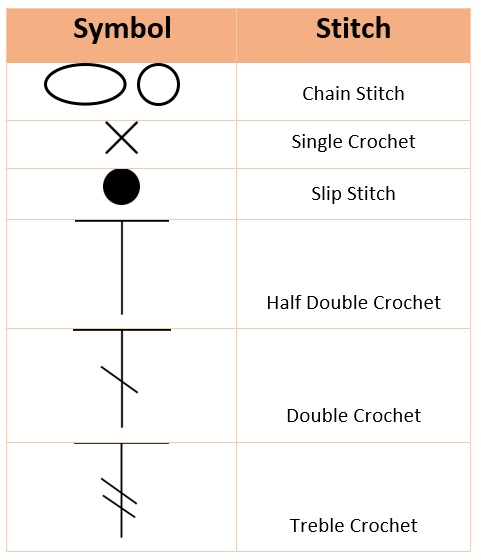
The following table contains most of the common stitches found in diagrams and charts.


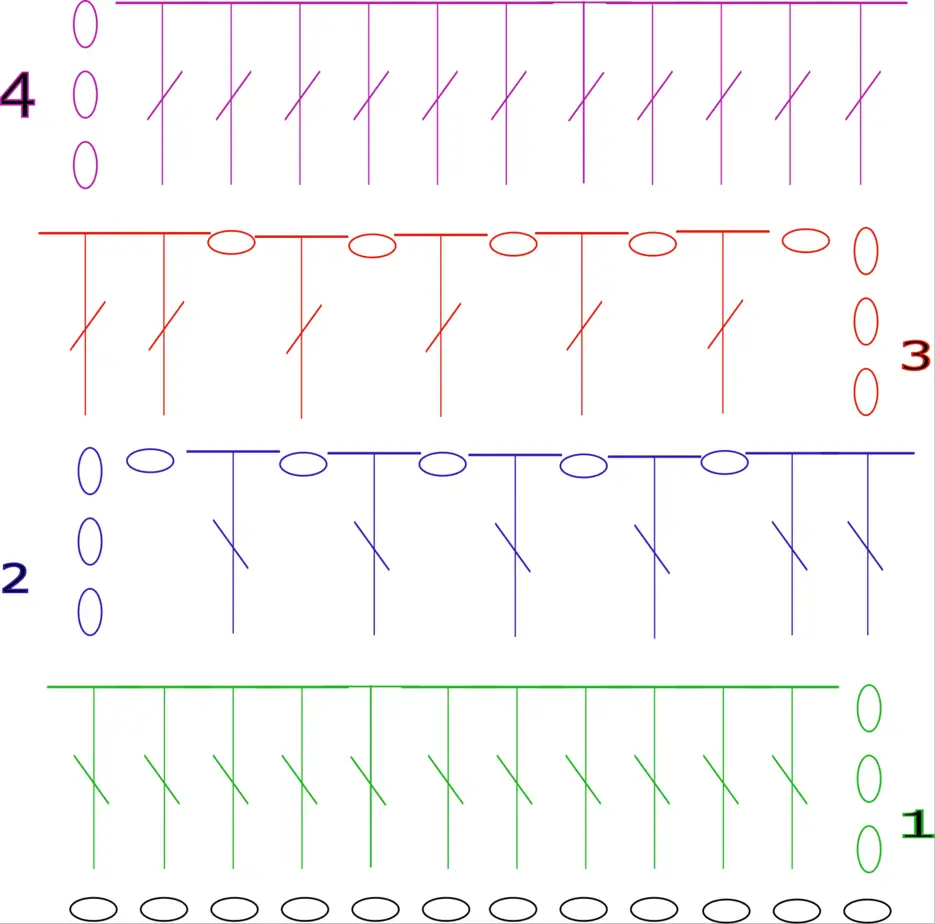
Here is a diagram I created for a Wagon Wheel motif.

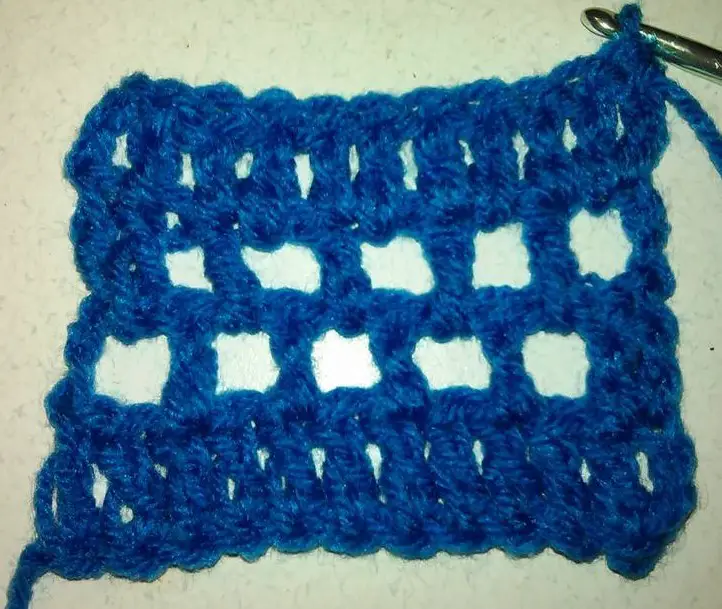
Here is the finished motif. You can see how the finished motif looks very similar to the chart.

Here are the written instructions for this chart:
Begin with a magic ring and 8sc in the ring
Round 1: Ch3, ch1 *dc, ch1* into each sc, join in 1st sc
Round 2: sl st into ch1 sp, ch4, dcc into ch1 sp *ch1, V st* into each ch1 sp, join
Round 3: Ch1, sc into each st around, join
Round 4: Ch5, sk 1 st, *dc ch2, sk st* around motif, join
In the image of the motif, I added an extra round of single crochet to set it off.
Here is a simple chart.
If this pattern were written out it would look like this:
Ch 15
Row 1: dc into the 4th ch from the hook, dc in each st across, turn
Row 2: ch4, sk1 dc *dc into the next st, ch1, sk 1 st* rep across to last 2 sts, dc into each st, turn
Row 3: ch4, sk1 dc *dc into the next st, ch1, sk 1 st* rep across to last 2 sts, dc into each st, turn
Row 4: ch3, dc in each dc and ch1 sp across fasten off, weave in tails.
And finally, here is the completed project.
Tips for Working with Diagrams and Charts
Diagrams and charts are great tools for working even with the most complicated patterns. With them, you can crochet patterns from anywhere since the symbols used are standardized.
Look at the diagram or chart and look for any special instructions. There should be information about the materials you need. Although these may be in another language, you can usually tell how much yarn or thread you need and the hook size.
Make sure you have enough yarn or thread to complete your project. While most yarns don’t have dye lots, the thread might so be sure to purchase enough of the same dye lot to keep the color consistent.
Look at the diagram or chart and see how the stitches come together. Most large projects use pattern repeats meaning only a portion of the pattern is given. This portion is repeated a specific number of times to create the crochet piece.
When using flat charts highlight the rows as you complete them or use a ruler and move it up the chart as you complete rows. This helps you keep track of where you are in the chart.
You can use a larger hook and yarn to crochet doilies and fine pieces. This is a clever idea to get used to working with diagrams before you try using thread and a very fine hook. I still do this just for fun.
Finally, relax and enjoy yourself.
End Notes
I hope this short tutorial has helped you understand patterns better. Please ask any questions you may have in the comments section. I’d be happy to help if I can. Please check back often as I will be sharing patterns and ideas. Thanks for stopping by and until next time, keep hooking!
If You Enjoyed this Article Please Share and Pin. It is Greatly Appreciated. 🙂


