Crochet graphs are used as graphic representations of crochet patterns. They are used in Filet crochet, Intarsia, Fair Isle, colorwork, and other types of crochet. Unlike diagrams, crochet graphs do not use symbols. Squares in the graph are filled in to signify stitches or colors. There are many graphs available online, and you can use a program such as Microsoft Excel and make your own.
Crochet Graph Basics
Crochet graphs as read from the bottom up. The foundation row is not included in a graph. The first row is read from right to left. The second row is read from left to right. Each odd row is read from right to left, and each odd row is read from left to right. This takes into account that you turn your work, not the graph as you work. I find it is a good idea to have a highlighter or ruler to mark which row you’ve completed so you don’t get lost.
Crochet Colorwork
This is an example of a very simple graph. It is 9 rows high and 9 stitches wide. Begin in the bottom right corner with Color A. Work th
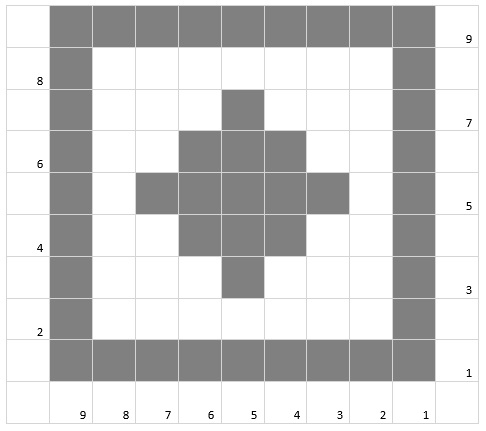
e first row and turn your work. Row 2 is read from left to right. The first stitch is worked in Color A, Color B is used for all but the last stitch which is worked in Color A. Turn your work. Continue up the graph working odd rows from right to left, and even rows from left to right. How you change colors depends upon what type of colorwork you are using.
Intarsia crochet uses bobbins of color. Each color change requires a bobbin of yarn. Colors are not carried across the work but picked up as they are needed. Color changes are captured in the stitches to give a clean look.
On the last stitch of the old color pull the new color through the last two loops of the stitch. Place the old yarn under the first stitch of the new color capturing it in the stitch and drop it, pull it to the front of the fabric to rest until you come back across the row and need it again. Mikey from The Crochet Crowd has an excellent video on Intarsia crochet.

One of the hardest things about Intarsia crochet is managing all of the bobbins if you have several color changes. Keep the unused colors pull forward and rearrange the bobbins when you turn your work. This will keep them from getting tangled.
Fair Isle Crochet
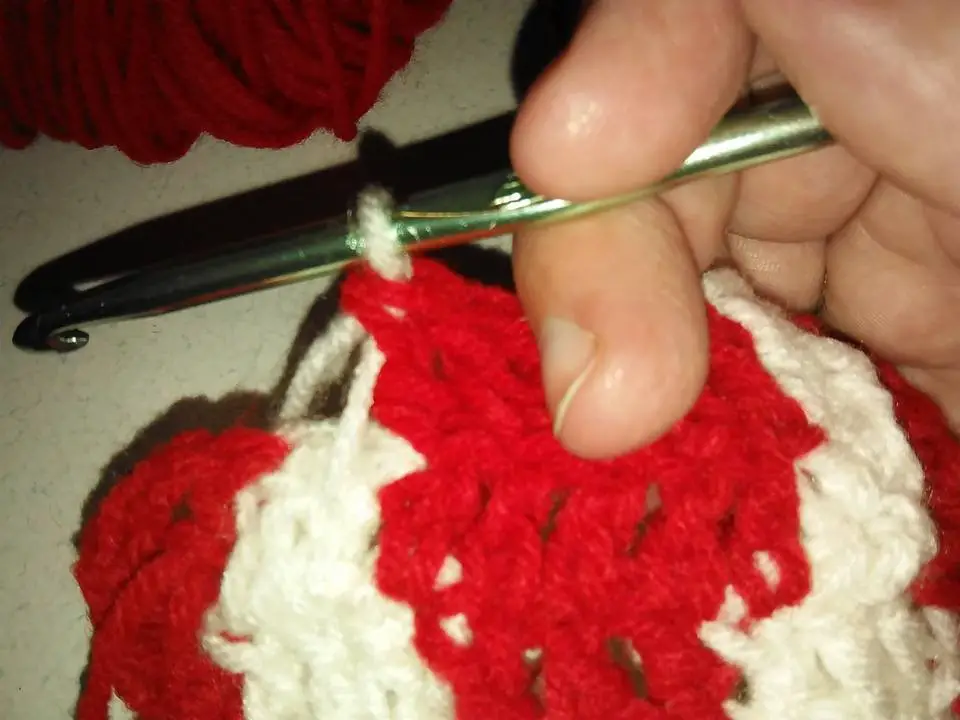
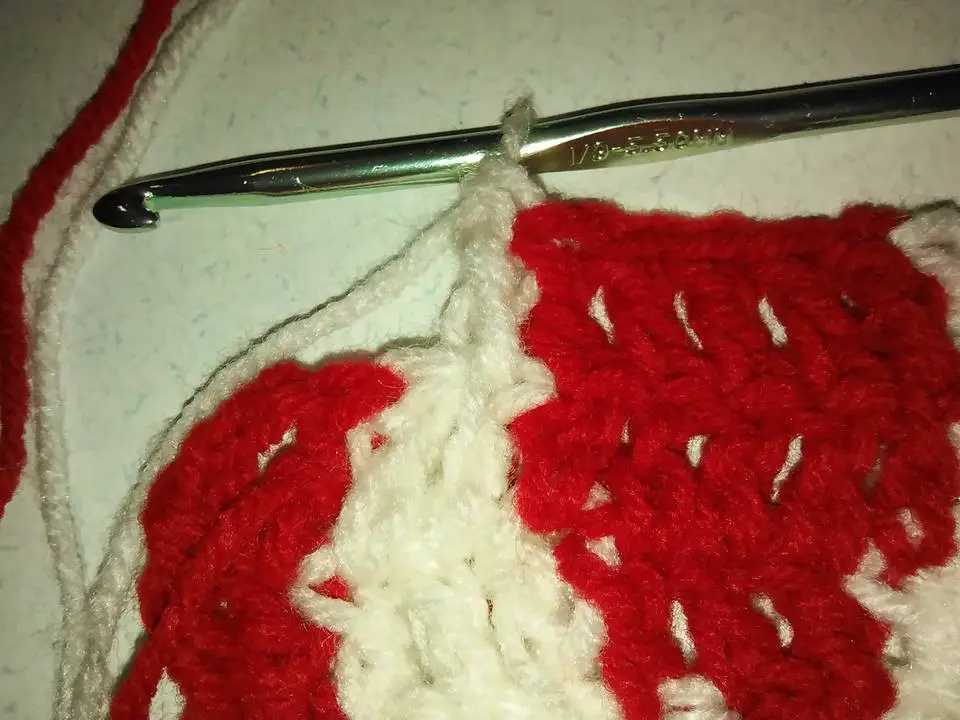
Graphs are also used for Fair Isle crochet. In this type of crochet, colors are carried along the back side of the fabric. Usually, only two or three colors are used at once. Color changes are very simple. Work the old color to the last 2 loops on the hook. Pull the new color through the last 2 loops. Work the new color carrying the old color along the wrong side capturing it in the stitches of the new color.
Continue with the pattern carrying colors along the wrong side of the fabric. When you turn your work, you’ll now be carrying the colors on the side facing you since this is still the wrong side of the fabric.
Try to carry the yarn no more than three or four stitches. If you try to carry the yarn too far it will either pull the fabric and pucker it, or your work will be too loose and messy. Check out this video by Sierra Tosner on Fair Isle color changes in crochet.
Tapestry Crochet
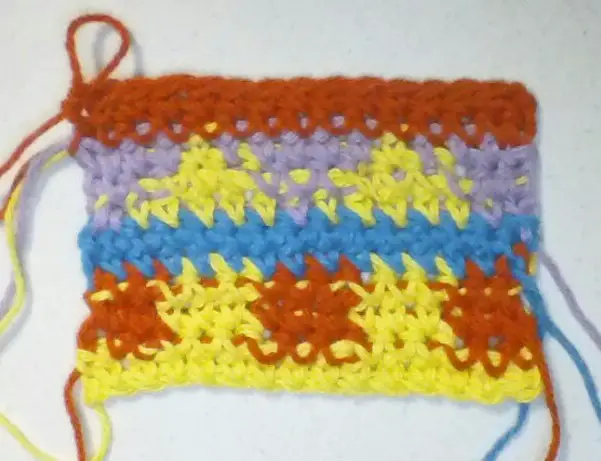
Tapestry crochet is traditionally used to create very vibrant pieces. Bold contrasting colors are used to crochet bags, baskets, garments, and home décor items. Instead of using bobbins or floating the yarn, the yarn is carried in the stitches along the row. You will be able to see the different colors peeking through the stitches, but this is one of the things that make Tapestry crochet so unique.
Normally you only use two colors at once so your work doesn’t get too bulky. Change colors, as usual, pull the new color through the last two loops of the old color’s last stitch. Catch the old color under the new color and then carry it along in the stitches as you work across the row. Mamma in a Stitch has a very detailed tutorial on Tapestry crochet if you’d like to learn this technique.
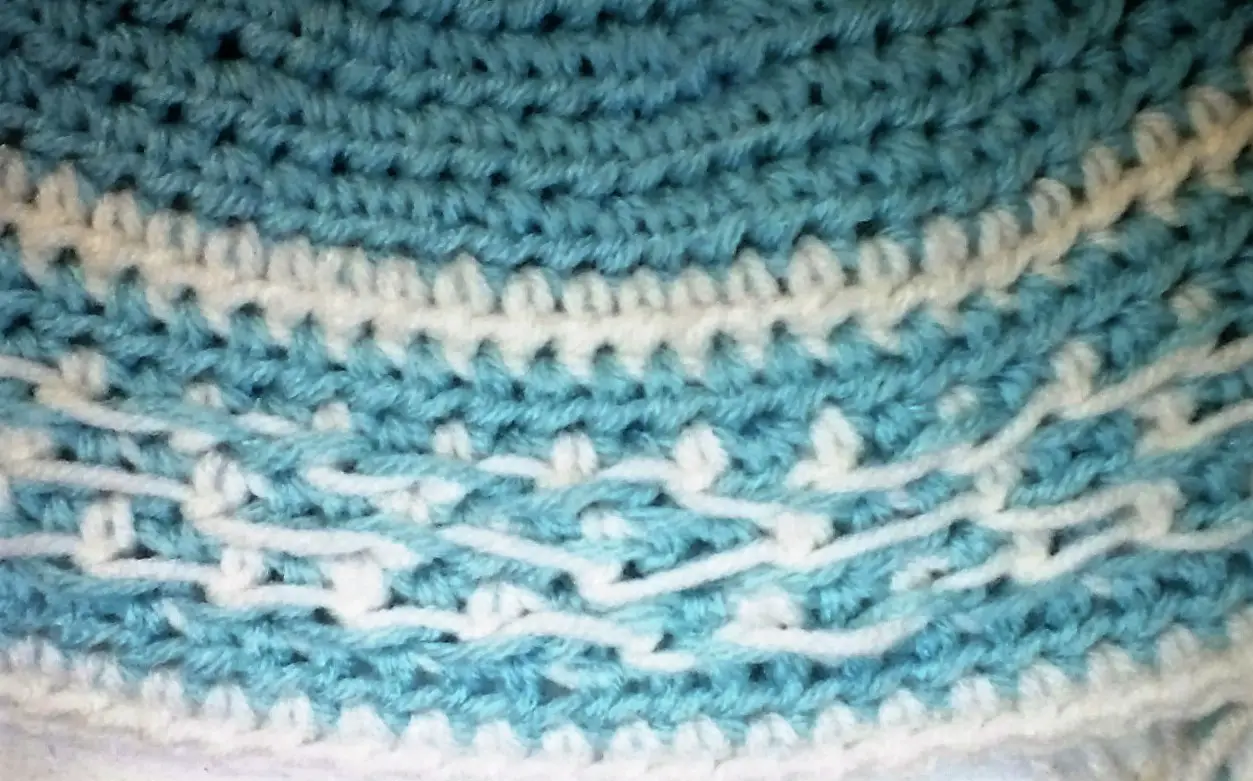
Bobble Stitch
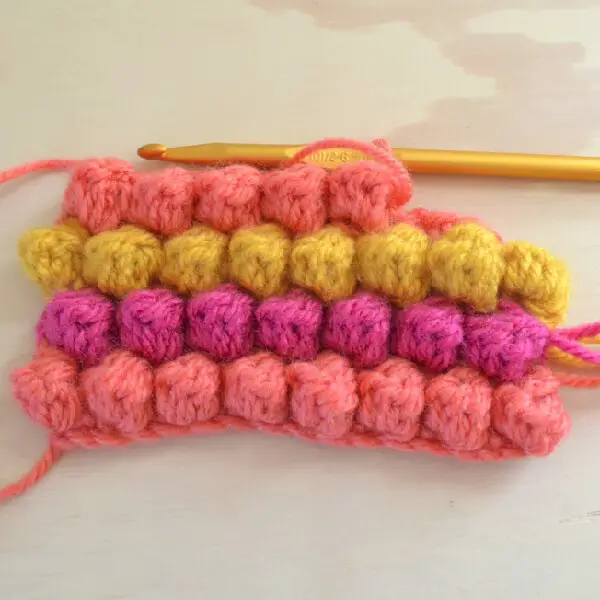
A really fun way to use a crochet graph is to work the pattern in bobble stitches. This creates a very textured and detailed pattern great for baby blankets. When using a crochet graph and bobble stitches, simply work a bobble stitch as the pattern.
Begin with an even number chain. Single crochet across the foundation chain and turn your work. Chain 3 and yarn over. Insert the hook into the next stitch, yarn over and pull the yarn through. Yarn over and pull it through the first 2 loops on the hook. Yarn over and insert the hook into the same stitch. Yarn over and pull through, yarn over and pull through the first 2 loops on the hook. Repeat this process 3 more times. You should have 6 loops on your hook. Yarn over and pull it through all 5 loops and chain 1. Single crochet into the next stitch.
Alternate bobble stitches and single crochet stitches. When you come back across the row crochet a bobble stitch into the single crochet space and work the single crochet stitch into the top of the bobble stitch where you chained 1.
There is a lovely example of the bobble stitch on the Dream a Little Bigger blog. She also has a wonderful tutorial and video on the bobble stitch.

Filet Crochet
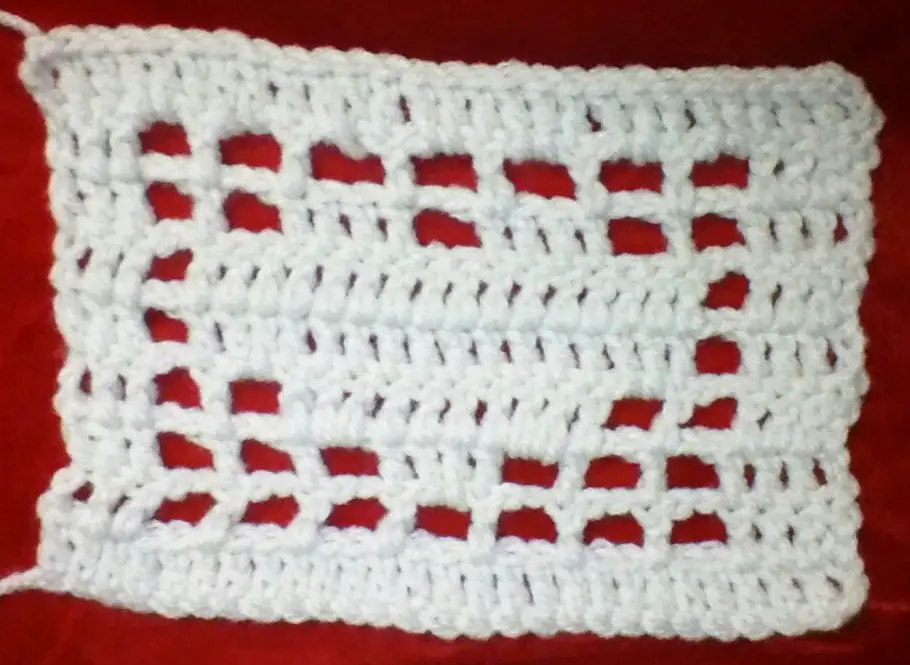
Filet crochet uses crochet graphs to create very pretty projects. If you know how to crochet a chain stitch and a double crochet stitch, you can Filet crochet. Graphs are read as usual, from the bottom to the top, and from right to left and left to right. If you can create the pattern on graph paper, you can translate it into a Filet crochet project.
You are basically crocheting a grid. The empty squares on the graph represent 2 chain stitches and 1 double crochet. The double crochet stitches should all line up and form a grid. The filled in squares represent 3 double crochet stitches. This combination creates the Filet pattern. You can find a very informative tutorial on Filet crochet at The Spruce Blog.
To begin to crochet the foundation chain in sets of 3. Chain 3 and work a double crochet into the 4th and 5th chain stitches. You will repeat this at the beginning of each row and double crochet into the last 3 stitches to create a border. At each filled in square work 3 double crochet stitches. As you work the stitches should line up. Remember to work the odd rows from right to left, and the even rows from left to right.
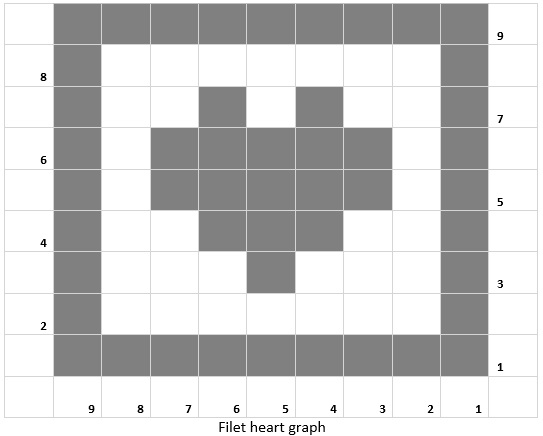
Filet Crochet Heart
Corner to Corner (C2C)
You can also use crochet graphs with the popular Corner to Corner (C2C) technique. The C2C pattern is crocheted diagonally. Begin in the corner and work your way up the pattern. Each new row increases the width and length of the piece until you reach the width you like. By using slip stitches on the edge you increase the length but not the width until you reach the correct length. To finish the piece, decrease each row until you have one set of stitches at the opposite corner you started at.
It sounds confusing, but once you have the idea down, it is a very easy and quick way to crochet a blanket or home décor item. Check out the great tutorial and free patterns for C2C projects at the Make and Do Crew Blog. You can also turn your own pictures into graphs by using the Stitch Fiddle site.
Crochet graphs make it easy to create pictures and patterns in C2C projects. Each box on the graph represents a group of stitches. If your pattern is a picture, use the Intarsia method of color changes. You will need a bobbin of yarn for each color change in the pattern. When you need to change color, pick up the new color and begin using it letting the old color rest until you come back and need it again. Hide the color change in the first double crochet of the new set of stitches to give you a smoother look. Pictures will look pixelated, but that is to be expected since you’re working with blocks of stitches.
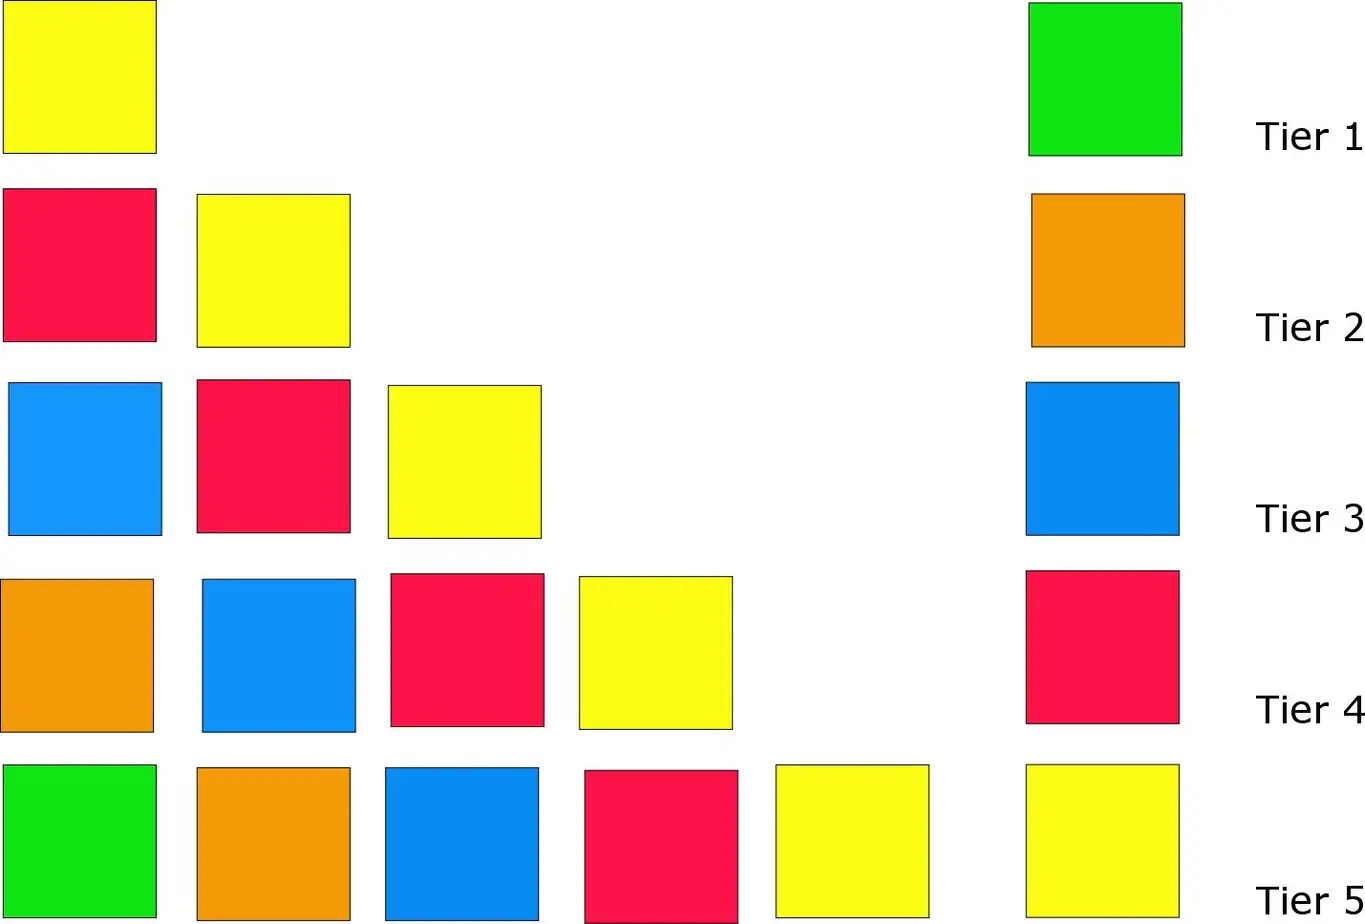
This illustration gives you an idea of how C2C projects are constructed. Instead of working in rows, you will be working in tiers. Each tier builds upon the last one.
To begin chain 6. Work a double crochet into the fourth chain from the hook. Work a double crochet into each of the next two chain stitches. This is the first block and tier one.
Chain 6. Work a double crochet into the fourth chain from the hook and work a double crochet into each of the next two chains. Fold the two blocks together and slip stitch into the chain three-space of the first block. Be sure the blocks don’t twist at this point. The edges should line up so that you can easily slip stitch into the chain three-space of the first block.
To begin the next block, chain 3. Crochet 3 double crochet into the chain three-space of the previous block.
Double crochet into the fourth chain from the hook, and into each of the next three chain stitches. Fold the blocks together and slip stitch into the chain 3 space of the adjoining block. Chain 3 to begin the next block in tier three.
work 3 double crochet into the chain 3 space and slip stitch into the chain 3 space of the adjoining block. Chain 3 and work 3 double crochet into the chain 3 space. Change colors at the end of the last double crochet stitch. This is the third tier.
To begin the next tier chain 6 since we’re still increasing the width and the length of the project. Double crochet into the fourth chain and into each of the next three chains. Fold the block so that you can slip stitch into the chain 3 space of the adjoining square.
Work across the tier chaining 3 and working 3 double crochet into each chain 3 space of the adjoining blocks until you reach the other side of the fabric. Remember you are working diagonally, not in straight rows.
Continue to chain 6 at the beginning of each new tier until you have reached the desired width. To stop increasing the width slip stitch across the double crochet stitches of the last block and into the chain 3 space of the last block. Chain 3 and continue across the tier as usual. If you want to make the project longer chain 6 on the opposite side of the fabric.
Once you are ready to quit increasing the length work the last block in the tier and instead of chaining 6, slip stitch across the side of the last blocked crocheted and into the chain 3 space. Chain 3 and continue to work blocks across the tier.
When you get to the other side of the fabric, slip stitch across the side of the last block and slip stitch into the chain 3 space of the last block. If you want to change colors, pull the new color through the slip stitch into the chain 3 space. Chain 3 to begin the next tier of blocks. Now you will begin to have fewer blocks per tier as your project takes shape.
Begin the next tier by turning your work and slip stitching across the side of the last block and into the chain 3 space. Chain 3 and continue to work the pattern. Repeat this process until you have one block left in the last tier. After you turn your work slip stitch across the side and into the chain 3 space. Chain 3 and work the last block. Slip stitch into the chain 3 space of the adjoining block. Fasten off the yarn and leave a long tail to weave in.
End Notes
Thanks for stopping by today. I hope this blog has given you an overview of how to use crochet graphs and what types of projects crochet graphs are used for. Do you use graphs? If so, what types of projects do you use them for? Please feel free to post pics of your projects in the comments section. I’d love to see your handiwork!
Until next time, take care and keep on hooking!
If You Enjoyed this Article Please Share and Pin. It is Greatly Appreciated. 🙂


