
The crocodile stitch is such a fun stitch! It can add a unique texture to your project or it can give your crochet creation the look of scales or feathers! This stitch can be used for everything from scarfs, jackets, hats, blankets, etc. It is a layered stitch so there are some parts of the pattern that are not fully attached but it gives any project a rare look that is specific to the crocodile stitch.
What I will be using for this stitch
- Size H hook (5mm)
- Medium weight yarn
Stitches that you need to know for this pattern are
Ch – Chain
Sc – Single crochet
Slst – Slip Stitch
This pattern will be worked in a series of base rows and scale rows. The base rows will set up the foundation for the scale that you will make. These rows will alternate ending with a base row.
The pattern that follows will create a test swatch for the crocodile stitch. This is a scaled-down version of a bigger pattern to let you try your hand and get used to a stitch. This is a great way to learn a new stitch and to build up your confidence with the stitch before using the stitch for a larger scale pattern like a blanket. Even if you don’t have a specific pattern in mind after you get comfortable with this stitch you can increase the test swatch pattern. This stitch is worked in multiples of six plus three. So you would chain any multiple of six and then add 3 more chains to the end of your initial step.
How the pattern can be manipulated
6 + 3
Pattern
There is a visual representation of each part of the pattern below the instructions for each row.
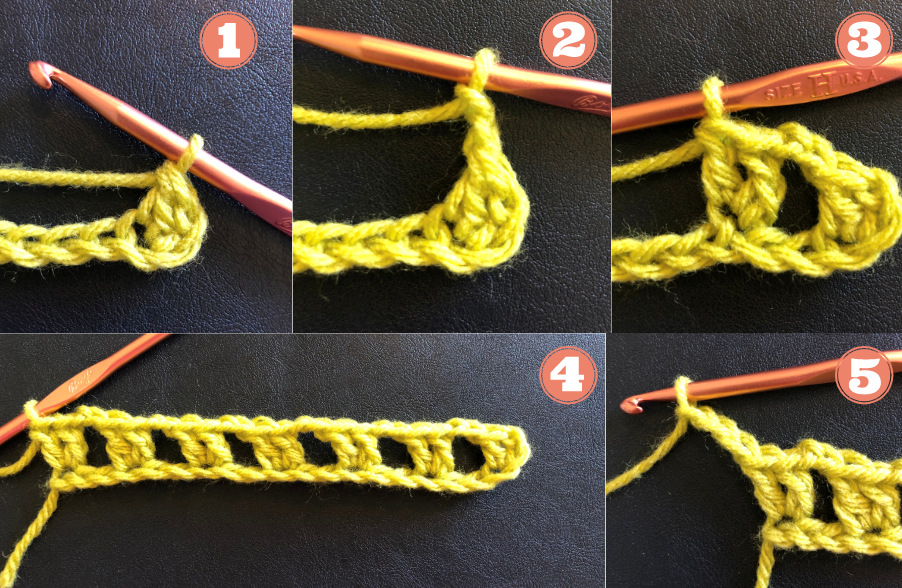
Start by chaining 21.
Base Row 1
Make one dc in the third chain space from the hook. *Ch 2, skipping the next 2 ch spaces make 2 dc in the next ch space. Repeat from the * five more times until the end of the row. This should leave you with 7 base blocks. At the end of the row ch 3. Turn.
Scale Row 1
This row will be worked down the dc foundations that you made in the base row. Make 4 dc down the first dc of the base row. Ch 1. Slightly rotate your project so that you can now make 5 dc going up the next dc of the base row. * Ch 1. Skip the next two dc’s. On the next dc of the base, row work 5 dc going down the base dc. Ch 1. Slightly rotate your project so that you can now make 5 dc going up the next dc of the base row. Continue to repeat from the * until you have reached the end of your row. By the end of the row you should have 4 scales made. Ch 3. Turn.
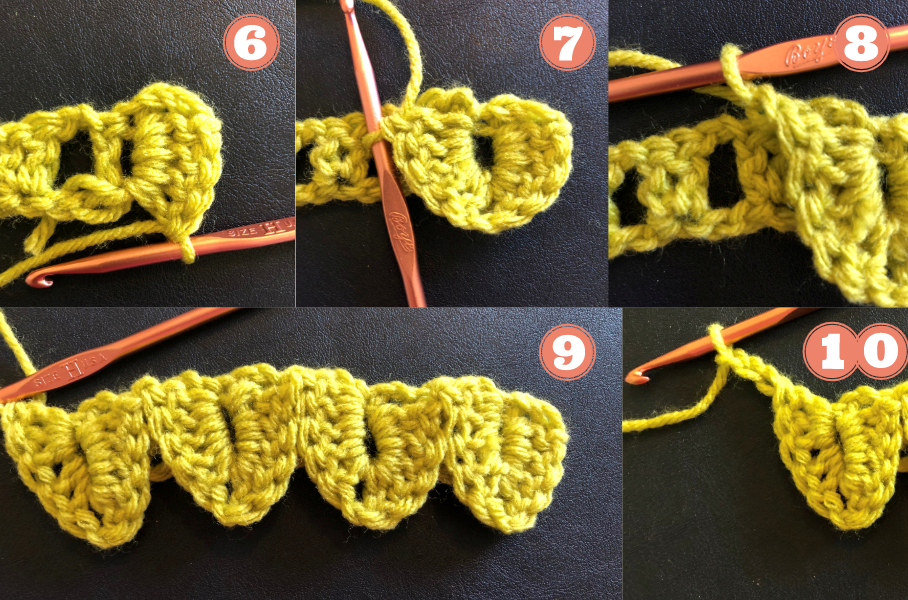
Base Row 2
Start by making one dc into the middle space of the first scale. *Ch 2. Make 2 dc into the space that is between the two scales. [This will go over the ch 1 space and the dc’s of the scale row]. Ch 2. Make 2 dc into the middle space of the next scale. Continue to repeat from the * until you have reached the end of the row. You should end up with 7 base blocks of 2 dc’s. Ch 3. Turn.
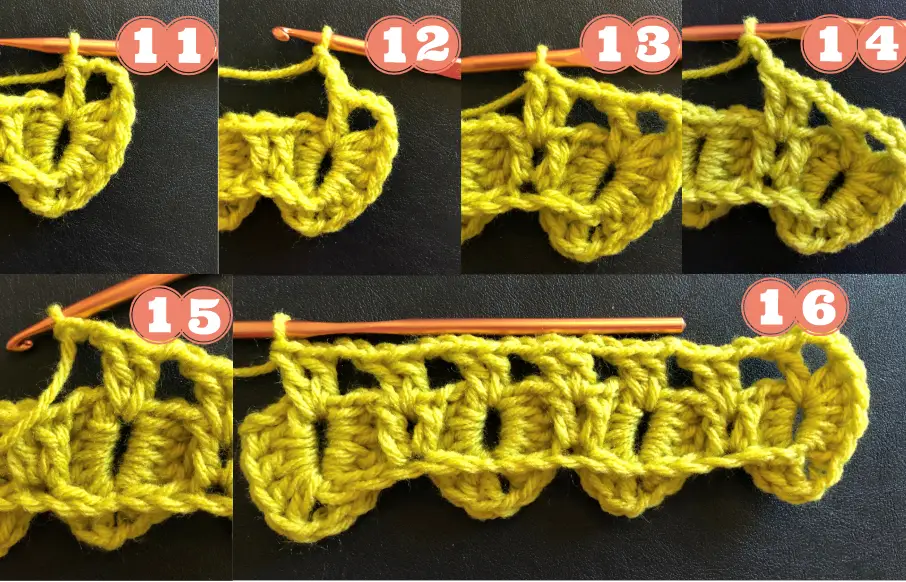
Scale Row 2
Skip the first base block then make 4 dc down the dc of the base row. Ch1. Slightly rotate your project so that you can now make 5 dc going up the next dc of the base row. * Ch 1. Skip the next base block then make 5 dc down the dc of the base row. Ch1. Slightly rotate your project so that you can now make 5 dc going up the next dc of the base row. Repeat from * until the end of your row. Ch 1. Turn. (you should now be looking at the backside of your pattern) sl st in the ch space. Ch 3. You should have 3 scales made for this row.
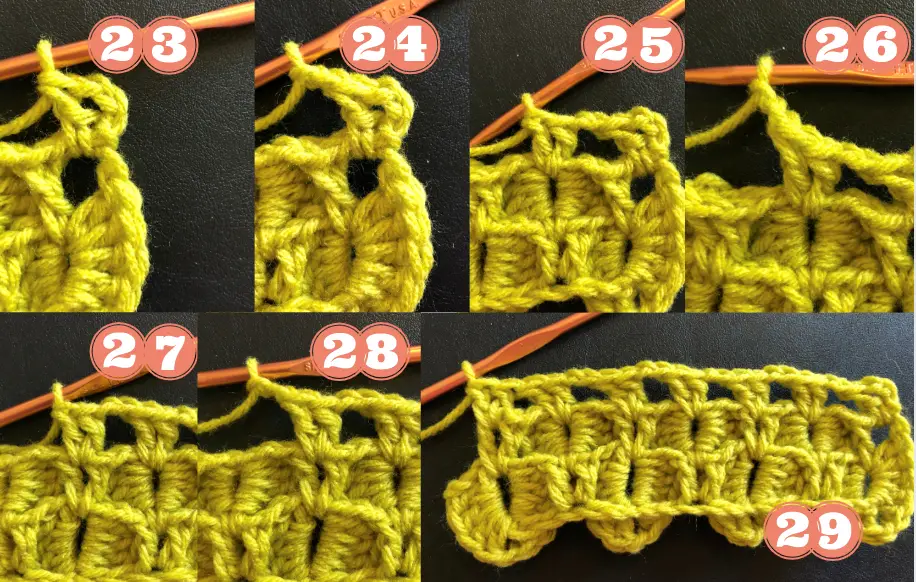
Base Row 3
Make one dc into the same space you just made the sl st. * Ch 2. Make 2 dc into the middle space of the first scale . Ch 2. Make 2 dc into the space that is between the two scales. [This will go over the ch 1 space and the dc’s of the scale row]. Ch 2. Make 2 dc into the middle space of the next scale. Continue to repeat from the * until you have reached the end of the row. You should end up with 7 base blocks of 2 dc’s. Ch 3. Turn.
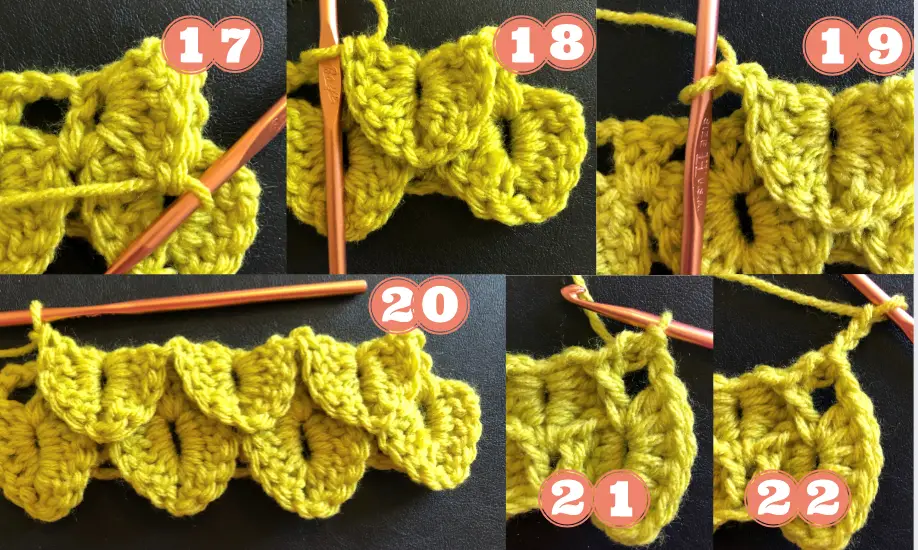
From here you will continue with Scale Row 1 – Base Row 3 until the desired length has been met. For the sake of this pattern and for practice repeat this once more. You should end with four rows of scales.
Now that you have learned this versatile and textured stitch you can use if for many future projects that are sure to impress!


