Learn how to do the bullion crochet stitch with this easy, step-by-step tutorial. Includes pictures and a video tutorial to help you follow along.
Do you like a challenge? Ready to branch out into new and different crocheting techniques? Good! Then you’re in the right place.
The bullion stitch is one of those crochet stitches that can really make your project pop. It’s often used for flower petals but can be used for so much more.
This stitch can be a bit tricky to master at first, but don’t worry! We’ve got you covered with these easy-to-follow steps. Just follow this bullion crochet stitch tutorial and you’ll be crocheting this stitch like a pro in no time!
Let’s get started!
What is the Bullion Crochet Stitch?
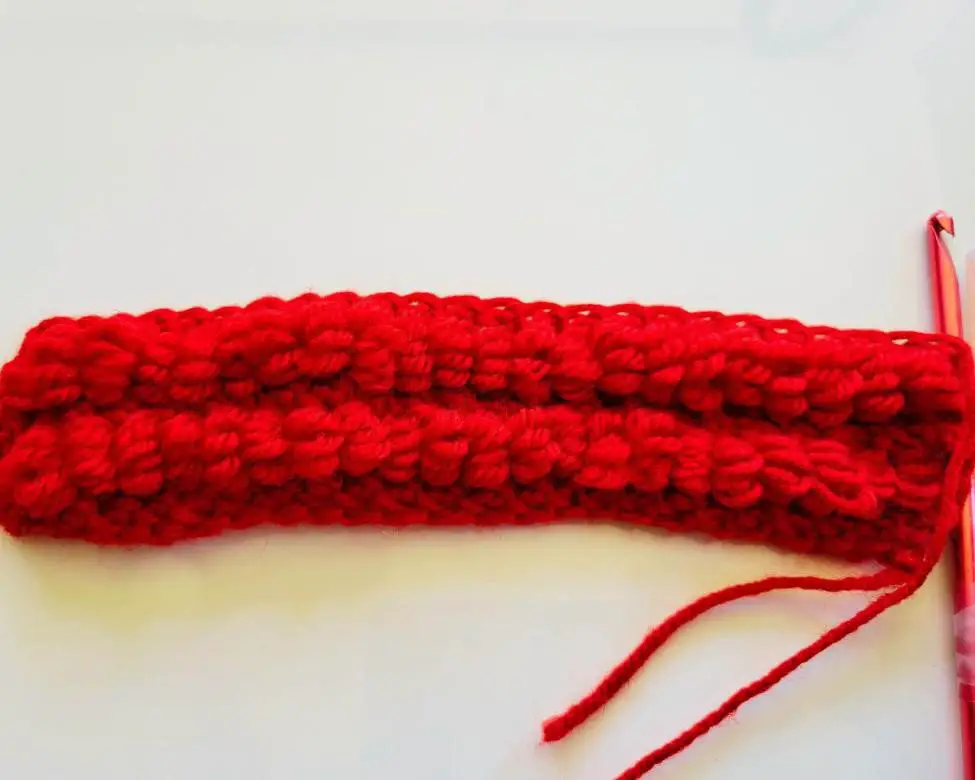
The bullion crochet stitch is a fun puffy stitch that creates a beautifully textured design. When you’re done, it looks like rows of stacked little rolls which is probably why it also goes by the name rolls stitch.
It’s made by wrapping yarn around your crochet hook multiple times and then working a slip stitch to close up the loops. This stitch is often used for flower petals or other decorative elements, but can also be used for bigger projects like blankets or scarves.
Although this is a more intermediate to advanced crochet stitch, with this bullion crochet stitch tutorial, I’ll break down how to do it in a few easy steps.
Bullion Crochet Stitch Tutorial Pattern Notes
Here are a few notes to help you work through this bullion crochet stitch tutorial:
Supplies Needed
- Yarn: any type of yarn or weight is fine. Just make sure your hook matches. For this tutorial, I used Craftiss Acrylic yarn in dark red.
- Crochet hook: Any size hook is fine as long as it matches the weight of your yarn. For this bullion crochet stitch tutorial, I used a 5.50 MM hook.
- A 2nd crochet hook: To make your bullion stitch easier to crochet, you’ll need a second crochet hook. You could also use a knitting needle as well. Just make sure your 2nd crochet hook or knitting needle is close to the same size as your main hook.
- Tape: You’ll need a small piece of tape to help hold together your 2 crochet hooks.
Abbreviations
For this pattern, I will be using the Craft Yarn Council U.S. abbreviations.
- yo: yarn over
- ch: chain stitch
- sc: single crochet
- tr: treble crochet
Variations of the Bullion Crochet Stitch
If you’ve done a little bit of research, you’ve probably noticed there are several different ways to do a bullion stitch, and therefore quite a few variations. That’s because you can choose how many times you want to wrap your yarn around the hook to create the stacked “roll.”
And depending on how many times you wrap your yarn, will determine the height of your first and last stitches in that row.
For example, with this bullion crochet stitch tutorial, I wrap the yarn around the hook 6 times. Because of how tall the stitch becomes, I start the row off with 3 chain stitches and end the row with a treble crochet stitch.
If I were to wrap the yarn around only 4 times, I would probably only need to start the row with 2 chain stitches and end it with a double crochet stitch. Likewise, if I wrapped the yarn around 8 or more times, I would need to start with more chain stitches and end with a taller stitch.
The important part is to make sure that your first stitch and your last stitch match the height of your bullion stitches.
Bullion Crochet Stitch Tutorial Video. Click Here
Follow along with me as I crochet the bullion stitch in this video tutorial!
Bullion Crochet Stitch Photo Tutorial
Here is the full pattern with pictures to help you follow along.
Prep your hooks:
Before you get started, you need to prep your hooks. Flip your 2nd hook and then line it up with your main hook so they’re both pointing in opposite directions.
Next slide the 2nd hook down a little bit, so the bottom is slightly below the curve of the first hook. Then tape your hooks together about ⅔ of the way down.
When you’re done, it should look similar to this:
Row 1: Ch any number of stitches. I used 24 for this pattern.

Row 2: Skip the first stitch and single crochet all the way across. Turn.
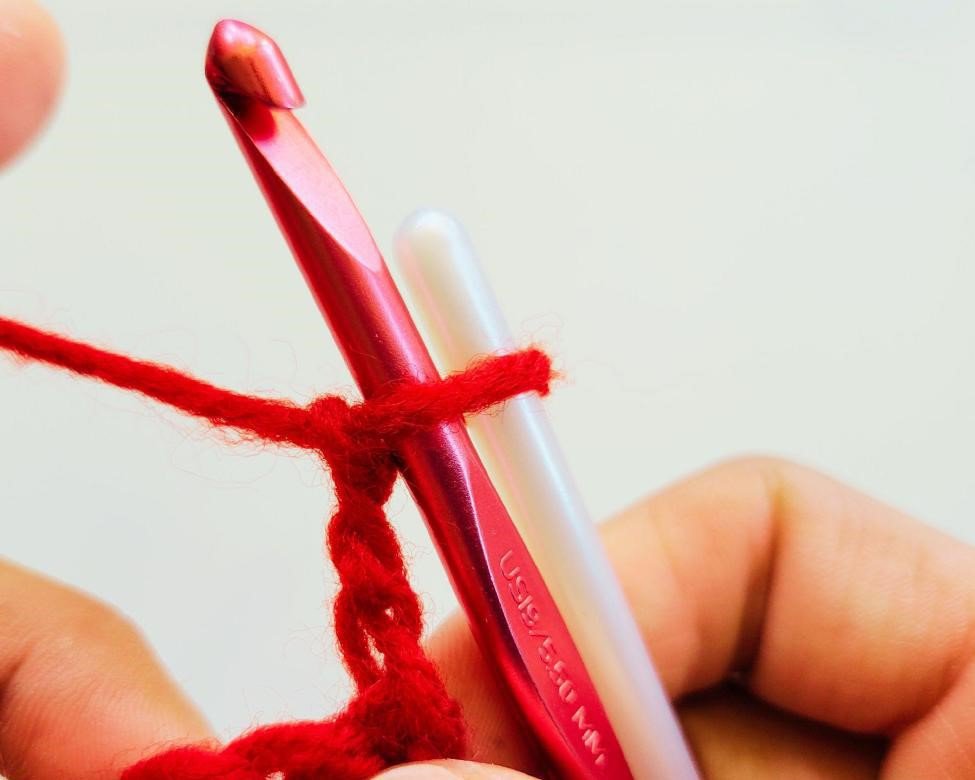
Row 3: Ch 3. (This counts as your first stitch)
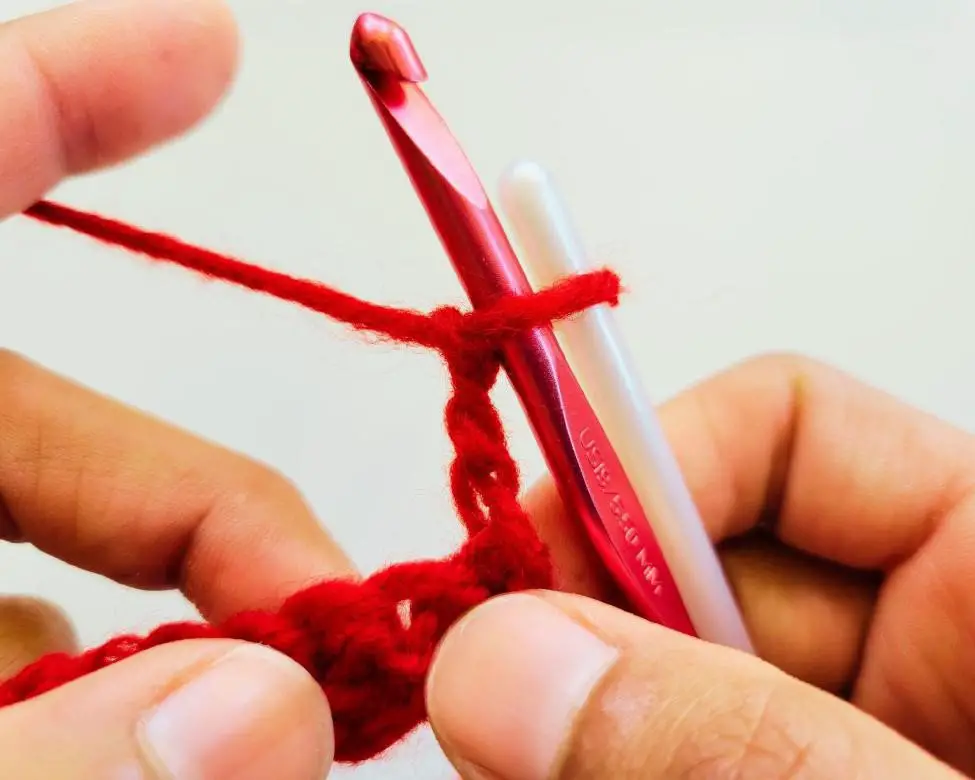
Next, *Stretch the loop on the hook and insert both hooks into the loop. Wrap the yarn around both hooks 6 times. (You should have 7 loops on your hook.)
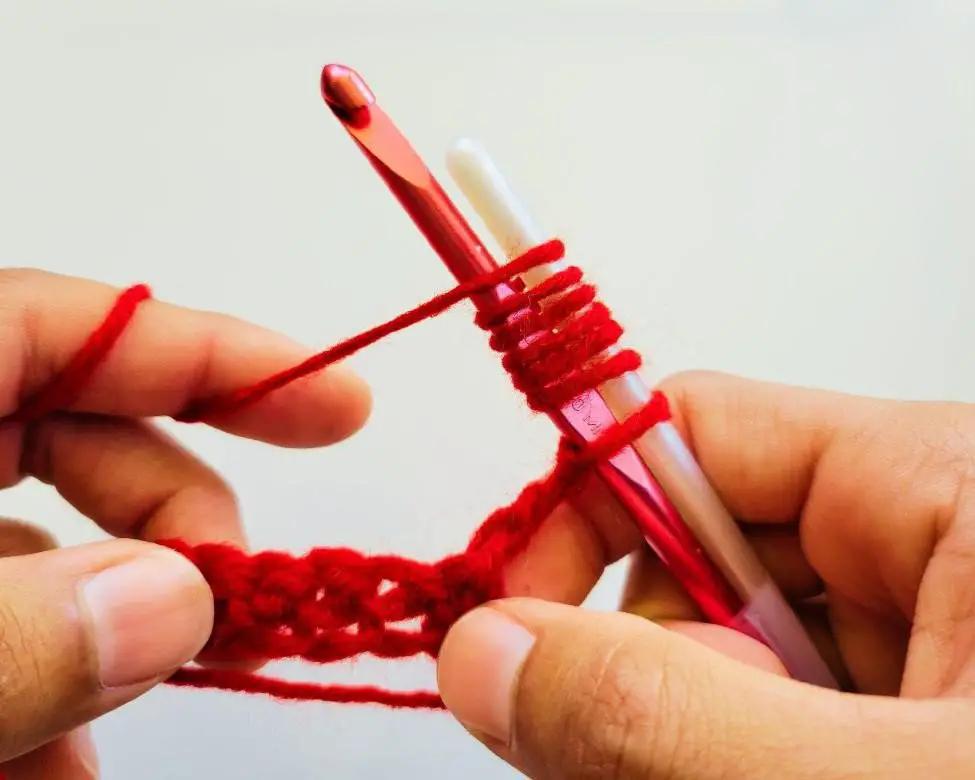
Insert just the main hook into the next stitch. Yo and draw the loop through.
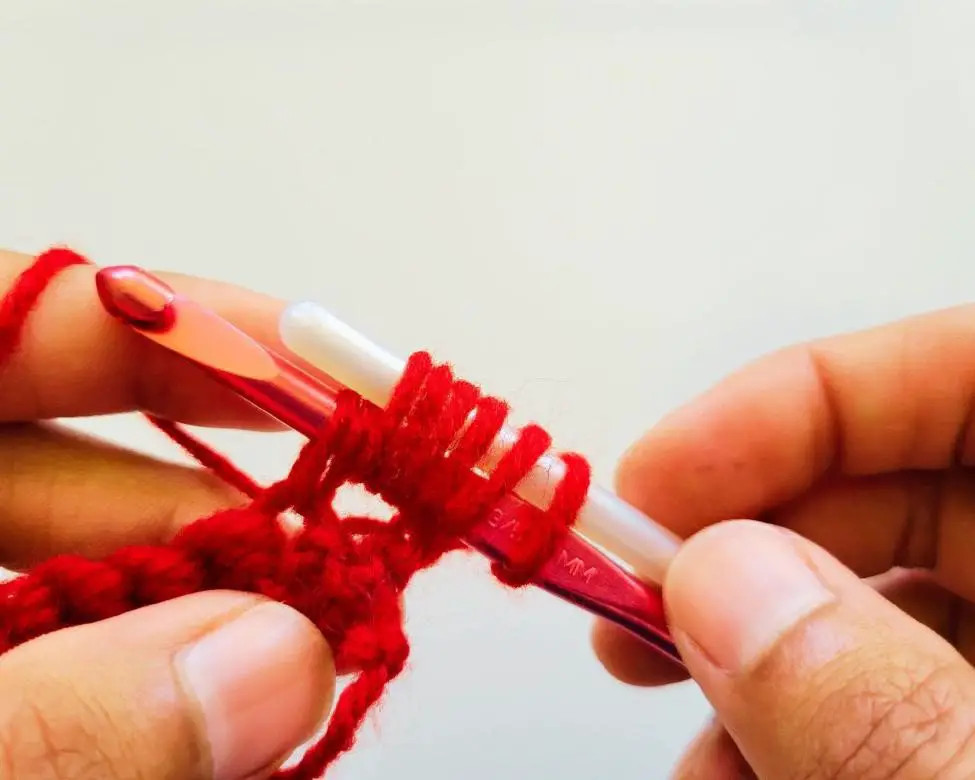
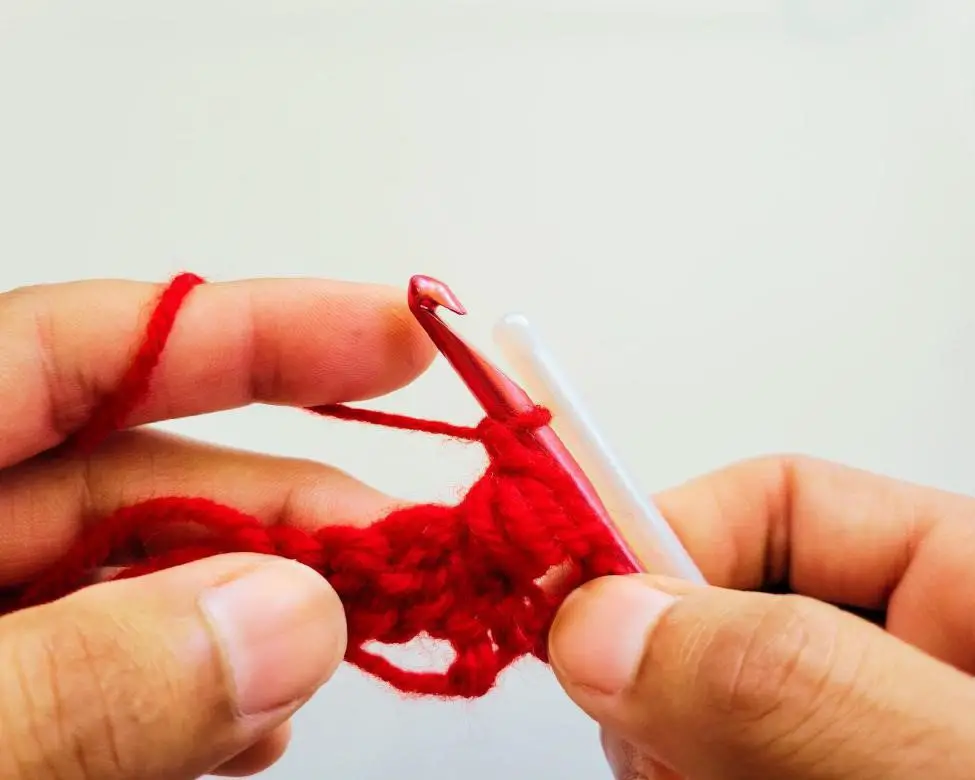
Pull the hook through all 7 loops. Ch 1. Repeat from the * until you get to the last stitch. Tr in the last stitch.
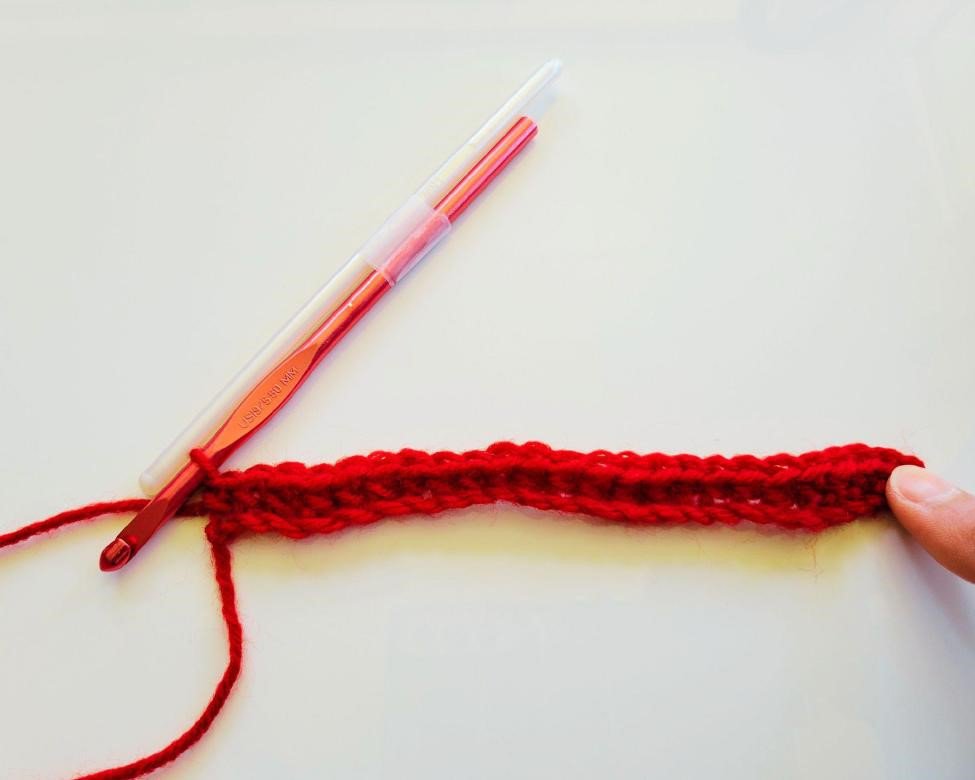
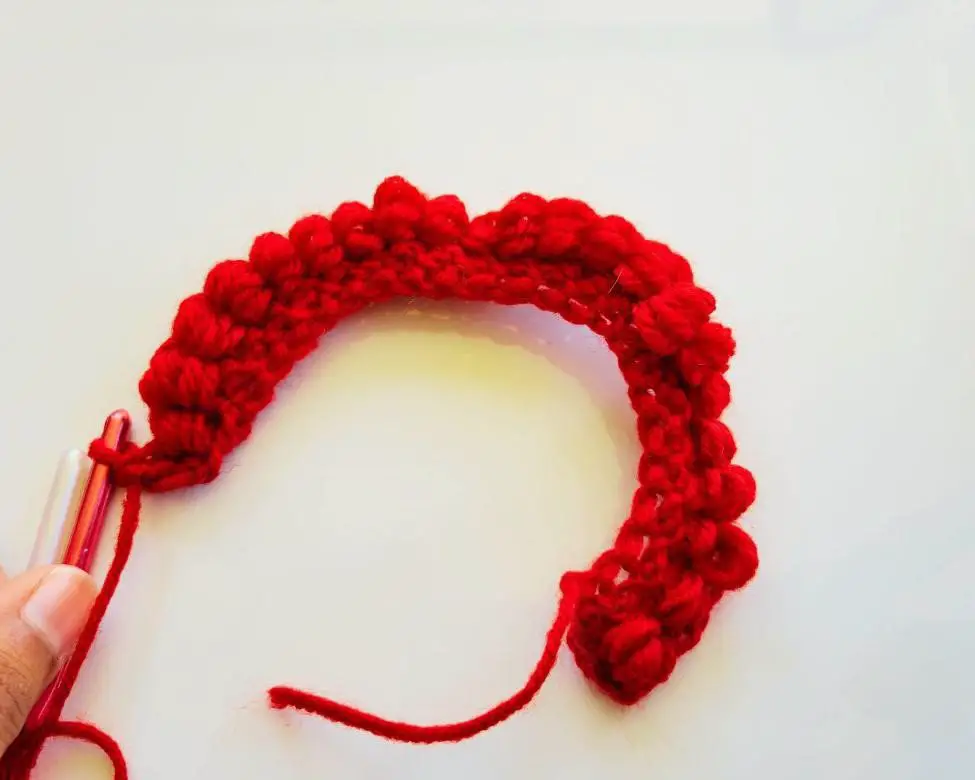
Your project will be curling quite a bit at this point. You can see how much mine curls in the picture below. That’s normal. As you continue the pattern it will start to flatten out.
Row 4: Ch 1 and turn. (This does not count as your first stitch.) Sc in each bullion stitch to the end of the row. DO NOT crochet in the chain stitches.
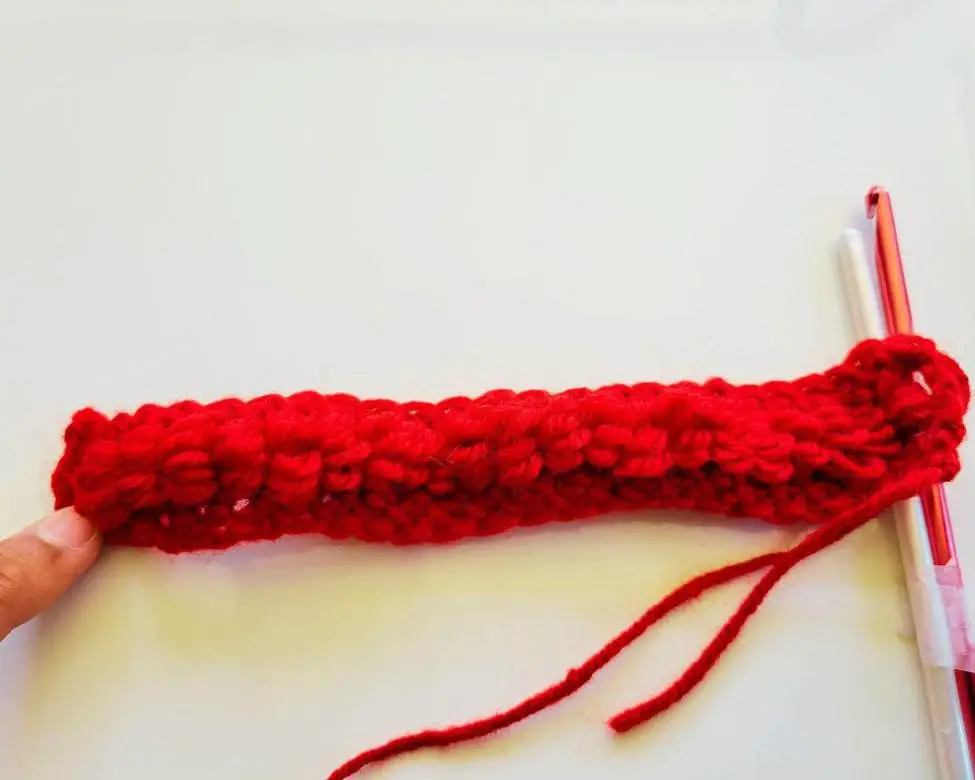
Row 5+: Repeat rows 3-4 until you reach the desired length of your project.
Tips for Working the Bullion Crochet Stitch
Here are some tips to help you as you work through this bullion crochet stitch tutorial:
- Use two hooks – there are variations of the bullion crochet stitch that only use 1 hook, but using 2 helps maintain consistent tension for your loops. It also makes it much easier to pull the crochet hook and loop all the way through without getting snagged.
- Alternate single crochet rows and bullion stitch rows – if you’re making a longer project, make sure to alternate single crochet rows with bullion stitch rows. It’s much easier to crochet bullion stitches into the tight, consistent rows of single crochet stitches. Plus, your project will lay flatter and better maintain its shape.
- Tighten up the tension on your last loop before you pull it through all 7 loops – if your tension is too loose before you pull it through, it will be hard to get it through all 7 loops. It might fall off or your hook might get snagged on another loop.
- Maintain consistent tension with your loops – To have a nice even look throughout all of your bullion stitches, make sure to keep consistent tension as you’re wrapping your yarn around the hook.
- End on a single crochet row to match the bottom border – this creates a nice finished look for your project.
FAQs About the Bullion Crochet Stitch Tutorial
Still, have some questions after reading through this bullion crochet stitch tutorial? Here are some common questions that come up.
Why does my project keep curling?
The bullion crochet stitch is a pattern that tends to curl up as you crochet. Especially in the beginning.
Because this design is squeezing and stacking up so much yarn, it just naturally curls up. Adding the single crochet stitch rows in between the bullion stitch rows does help to flatten it out as it goes along.
If you’re still having trouble, you can try blocking your project or loosening up the tension in your single crochet stitches.
My loops aren’t all the same size. How can I fix that?
If your loops are different sizes, it’s probably because you’re not maintaining consistent tension as you’re wrapping the yarn around your hooks. Try to be aware of how tightly you wrap each loop and make sure they’re all about the same.
What size project should I make?
With this stitch, you can make your project as long as you want. The bullion stitch is a great stitch to use for blankets, scarves, or similar projects.
Because it tends to curl a bit in the early stages, I do suggest you use it for bigger projects to help it lay more flat.
Because it’s such a dense stitch, it’s not recommended for projects like hats or sweaters where you need a little more breathability.
Can I use any type of yarn for this stitch?
Yes! You can use any type of yarn for this stitch. Just be aware that the bigger the yarn, the bigger your loops will be.
If you’re using a thinner yarn, you might need to wrap the yarn around your hook more times to get a nice, full “roll.”
I hope you enjoyed this bullion crochet stitch tutorial! If you have any questions, please feel free to leave a comment below.
And don’t forget to share your finished projects with me on Instagram (@crochetgasm) – I can’t wait to see what you make!


