Hello and welcome to today’s blog! I’m glad you stopped by today as I have a very special tutorial for you. I have always liked the look of lace but never had the chance or time to learn how to create it. A few years ago I discovered filet crochet. Filet crochet gives you the look of lace, but instead of using needles or tatting, you use a crochet hook and yarn.
A Short History of Filet Crochet
Filet crochet is thought to have its roots in how fishermen mended their nets. The fishermen used knots to mend and strengthen their nets. Their wives picked up on this technique and developed filet crochet to mimic lace. Patterns for filet crochet can be found in needlebooks of the late 19th century. In 1912 the term “filet crochet” appeared for the first time in pattern books. Before that time the technique was known as square crochet.
You can use cross-stitch patterns, beading patterns, needlepoint patterns, and just about any simple graph pattern that can be used for filet crochet. Filet crochet uses a grid pattern to create pictures and patterns. The majority of filet crochet patterns use a graph. You may find written patterns, but I find them very confusing. I’d much rather look at a graph and know exactly what my project should look like than slog through written instructions.
How to Read a Filet Crochet Graph
Today we will learn how to read a crochet graph and how to crochet the filet technique. I know before I learned the basics, graphs were intimidating. But they are very easy to read once you know the basics. Designers use graphs as visual representations of patterns. Odd rows are worked from right to left, and even rows are worked from left to right. Graphs are also read from the bottom up. The foundation row is not included on a graph. The stitches used are double crochet, single crochet, and chain stitch.
On a filet crochet graph, stitches are represented by blocks. Each block represents three stitches.
Filled in blocks represent 3 double crochet stitches.
An empty block represents a double crochet and 2 chain stitches.
The large blocks with the curved “V” are the lancet stitch and are worked in two rows. The first row consists of chain 3, skip 2 stitches, single crochet into the next stitch, chain 3, skip 2 stitches, double crochet into the next stitch to begin the next file group of stitches. On the next row crochet a double crochet and 5 chain stitches over the chain 3, single crochet, and chain 3.
Chain 3 at the beginning of each row and work a double crochet into the last stitch. The beginning and end stitches are not represented on the file graph.
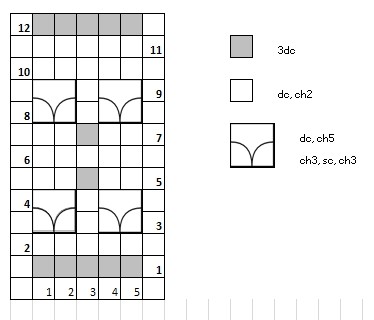
Take a look at the above filet crochet graph. You will notice the row numbers are on both sides of the graph. This is to help you remember to work the odd rows from right to left and the odd rows from left to right.
Each block represents 3 stitches. Calculate the foundation chain by counting the blocks across a row and multiply this number by 3. Add 4 stitches for the beginning chain and end double crochet stitch. For this example, you will need a foundation chain of 19 stitches (15 chains for the filet stitches, 3 for the beginning chain, 1 for the end stitch).
Row 1: Chain 3, since the first row is all filled in, work 3 double crochet stitches for each block, 15 dc, work 1dc into the last stitch.
Row 2: Chain 3, since the second row’s blocks are not filled in you work a dc, ch2, sk 2 sts for each block and a dc into the last stitch.
Row 3: Repeat Row 2
Row 4: Chain 3, dc into next st, ch3, sk 2 sts, sc into next st, ch3, sk 2 sts, dc, ch2, sk 2 sts, dc into next st, ch2, sk 2 sts, dc into each of the next 2 sts
Row 5: Chain 3, ch5, sk 5 sts, dc into next st, ch2, sk 2 sts, dc into next st, ch5, sk 5 sts, dc into each of the next 2 sts
Row 6: Chain 3, *dc, ch3, sk 2 sts, dc into next st* rep, 3dc into ch2 sp, *dc, ch3, sk 2 sts, dc into next st* rep, dc into last st
Row 7: Repeat Row 4
Row 8: Repeat Row 5
Rows 9 & 10: Repeat Row 2
Row 11: Repeat Row 1, fasten off, weave in tails
As you can see, a graph is much less confusing if you know how each stitch is represented. Remember these points as you work filet crochet graphs.
- The foundation stitch is not represented on the filet graph.
- Each block represents 3 stitches.
- Chain 3 at the beginning of a row and double crochet into the last stitch.
- Read odd rows from right to left and even rows from left to right.
- Filet graphs are worked from the bottom right corner up the graph.
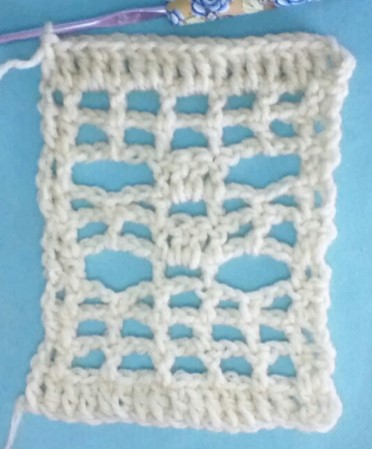
- The double crochet stitches and chain 2 stitches should line up to make a mesh fabric.
- Pictures in the fabric can be made with solid blocks on an empty mesh, or empty blocks on a solid fabric.
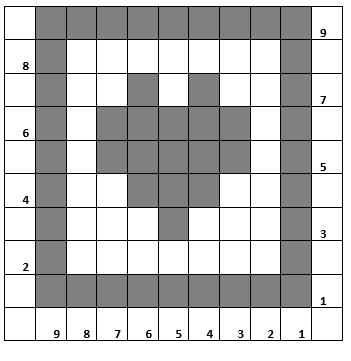
Here is a small heart filet crochet graph.

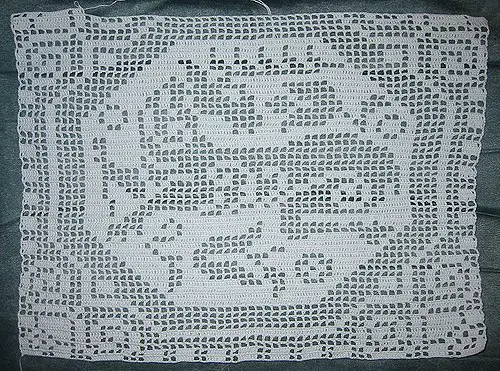
This is the heart worked up in filet crochet.

Creating Your Own Filet Crochet Graph
Part of the fun of learning filet crochet is trying out making your own graph patterns. I use Microsoft Excel and the blank graph paper template.
Don’t add the foundation chain to the graph. Also, don’t worry about adding the beginning chain 3 and double crochet into the last stitch on the graph. Remember each block represents 3 stitches. This means if you have 15 blocks across the row you will need to crochet 45 stitches.
Since each block represents 3 stitches and you need to have a chain 3 and ending double crochet stitch, the foundation chain needs to be in sets of 3 plus 4 (3 for the chain 3 and 1 for the ending double crochet).
Number the rows so you can keep track of where you are in the pattern. You can put the odd numbers on the right and the even numbers on the left if you like. Or you can just put all the row numbers on one side, it is up to you.
That is really all there is to it.
Recommended Reading. Free on Kindle with Kindle Unlimited.
The Almanac of Crocheting is the complete comprehensive A to Z guide on crochet available on Kindle and Free if you have Kindle Unlimited. It will take you from a beginner’s level all the way up to advanced. And countless projects for the novice all the way up to the Expert. This Box set takes you from step one novice all the way to expert with detailed instructions and pictures. Click Here to take a look at it on Amazon.
End Notes
Thanks again for stopping by. I hope this tutorial on reading and working filet crochet graphs helped you learn this fun type of crochet. I really enjoy filet crochet. You can use just about any weight yarn except for bulky or jumbo. If you use a thin yarn or cotton thread you will end up with pieces that look like lace. Be sure to block your work to open up the stitches and shape your project.
If you have any questions, please let me know in the comments. I will get back to you as soon as I can. As always, take care and keep on hooking!


